Monday, October 31, 2011

BluPrint November 2011 Polymer Clay Canes, Beads and Jewelry

Volume 8 Issue 11, November 2011

What's New in November?

Banana Bread! - Ok, this is a bit different than my usual post, but I have to share this wonderfully easy and moist bread/cake recipe. All you really need is a couple overripe bananas.

• 3 or 4 ripe bananas, smashed

• 1/3 cup melted butter

• 1 cup sugar

• 1 egg, beaten

• 1 teaspoon vanilla

• 1 teaspoon baking soda

• pinch of salt

• 1 1/2 cups of all-purpose flour

This recipe is really easy—smash your bananas with a wooden spoon, pour the melted butter in and stir it well. Beat the egg with a fork before pouring it into the mix, add sugar and vanilla and mix well. Sprinkle the salt and baking soda over the mixture and mix again. Then add all your flour and mix completely. Pour into a buttered loaf pan and bake for one hour at 350.

This bread is moist and light and great with a winter cup of coffee. So, don’t toss out overripe bananas, it only takes a couple minutes to mix up this great bread.

Recipe borrowed from a recipe site.

Now, on to beads and canes.

Flower Canes - I am getting ready to mix up another batch of fun flowers. I have been working on new designs and have cannot wait to get started. I had to set up a new work bench in my little cabin rental in order to work on my flowers. Otherwise, the flowers were threatening to take over my kitchen table and then where would I put my laptop? :)

clip_image002clip_image004clip_image006clip_image008clip_image010

Artfire—In an effort to conserve space, accommodate my regular customers and to take advantage of a great handmade site, I have consolidated all my websites into one at Artfire. All of my other sites are still updated and used, you can still access your customer information and your order history, I am just using Artfire to save space and make it convenient for my customers.

You will find Blue Morning Expressions, X-Stitch-Patterns, The Seed Bead Pattern Store, and Clipon Earrings Boutique. If you are interested, you can find me at http://www.artfire.com/users/bluemorningexpressions

Writing—I have spent the last month writing full-time and I must confess, I have sorely neglected all my canes and polymer clay items. I did over 250 web articles and one feature article for a local newsmagazine. All of these things were fun to do, but very time consuming and my clay suffered. I had quite a few sales of canes and over half of my inventory went out in boxes this last month. That is good for clearing space for me, but bad for providing a great selection of canes for you!

Beads—I am working on new focal beads and doing a few necklaces with the penguins that I did last year for Christmas. I have six focal beads ready go and will get those necklaces done soon. The next sets of focal beads will be ready in the next couple of weeks. You can find both the beads and the finished necklaces on www.bluemorningexpressions.com or at my Artfire store http://www.artfire.com/users/bluemorningexpressions

As always, thank you for all your support and emails.

www.bluemorningexpressions.com      clip_image002

Until next month,

Julie & Blu

Earrings—These are all created from my bead sets, I used both floral rounds, heart swirl lentils, and full size 20mm pillow beads to create 30 new sets of earrings. Each set is under $4—I wanted to create an affordable set of earrings for gifts that can be easily purchased in groups. They make great stocking stuffers and can be converted to pierced look earrings if you like.

clip_image002[4]clip_image004[4]clip_image006[4]clip_image008[4]clip_image010[4]clip_image012clip_image014clip_image016clip_image018


clip_image002[6]clip_image004[6]clip_image006[6]clip_image008[6]

Sunday, October 23, 2011

Wednesday, October 19, 2011

Polymer clay heart lentil bead dangle earrings

Heart Polymer Clay Swarovski Crystal Dangle Earrings

Heart Lentil Beads - I created a set of these on a whim for the Peas and Carrots bracelet that I did and was so pleased with the results that I decided that I would create a couple dozen little earring sets.
My idea to create earring sets has been spurred by my adoration of the lampwork artists and their earring pairs. They are just affordable enough for me to buy a set of beads and create my own crystal and glass earrings. I wanted to do the same thing with polymer clay for folks that didn't want to get a whole set of eight beads. These earring pairs work up quickly and nicely - just in time for an evening out with friends.
I seem to be drawn to anything shiny, so I have a natural affection for Swarovski crystals and try to use them in all possible ways. These earring beads just begged to be dressed up a bit with dangling and shiny crystals.
I wrapped each crystal with wire so that I could attach them to jump rings and waterfall them down from the bottom of the heart. I used a lot of 4mm crystals in these earrings - they seemed to be the best size for the 10mm hearts.
Because I love black as a design option, I chose the black, yellow and red clay to use as my base bead. I knew that the yellow would contrast nice in the bead and give me the possibility of an orange combination. That also gave me an excuse to use my all time favorite Swarovski color - Fire Opal.
These earrings are fun and affordable and I know that I will be making a lot more of them, they just will all look different due to the combination of the clay used. I have a huge box of crystals in dozens of different colors, so I am not worried about any of these earrings looking the same.
See a pair of beads that you would like created into a similar set of earrings? Just let me know and I will create the earrings for you.
Enjoy shiny things,
Julie and Blu

Playing Through

Polymer clay golf ball pot holder magnets for the kitchen


Handcrafted Polymer Clay Golf Ball Pot Holder Magnets

When you live in Florida, you are surrounded by both the beautiful waters of the Atlantic Ocean and miles and miles of golf courses.
Like a lot of my goodies, these started by those wonderful three words that we all love to hear, "Do You Have ....." which is a variation on the theme of "Can You Make..."
A friend of mine needed a gift for a lovely lady golfer and she saw some  ladybug pot holder magnets that I had done and asked how hard it would be to create golf balls for her friend's kitchen. I thought about it a minute and said, "well, I could do a set of two for your friend, if you give me a couple of days to get them done".
It was a mutually beneficial exchange, she had a set of magnets that couldn't be found anywhere else and I had a new product line that given my locale, made for a popular gift.
I used Fimo Soft to form my golf balls, I added my hook and glued it in before baking. I attached a heavy duty thick magnet on the back, and now these are ready for a place of honor on any golfer's refrigerator. Priced right and fun, those are two things that I strive for in my creations.
Most of all, fun.
See you on the 19th hole.
Julie and Blu

Purple Blue Disk Beaded Necklace Pearl


Hoppy Taw
Yeah, that's what I named this polymer clay piece featuring my kaleidoscope canes on large cookie shaped disk beads.
The Hoppy Taw was a staple of my childhood. No self respecting 3rd grader ever played hopscotch at school without a Hoppy Taw of one's own. They seemed to be magical and could make you stand on one leg a lot longer. This silly thick rubber disk was some marketing genius's bread and butter. In fact, it wasn't until a couple years ago that I even checked to see if it was really called a Hoppy Taw or if that was some misheard lyric type situation of childhood. It was in fact called just that.
When I created these disks, that was the first thing that came to mind. They are large, colorful and can probably make you stand on one leg longer than anyone else.
Each disk has been double drilled and hand sanded smooth and had a light coat of varnish added for some shine.
The potato pearls both between the beads and hand wrapped on the chain have been dyed to an iridescent blue and purple which is one of my favourite colour combination.
I merged the sets of cable into a single strand and loaded it up with delicas, plated chain and wire wrapped additional potato pearls and Czech glass beads.
The clasp is a pewter rose and the ends have been double crimped and double crimp covered. I used E6000 cement on the crimps and covers to secure the ends.
This has been designed to curve and will automatically do that when you wear it. The length is a comfortable 24 inches.
It is a lightweight piece but it does have a bit of bulk to it due to the size of the disks.
©jcleveland

Polymer Clay Pillow Beads with Floral Canes, Butterflies and Translucent Canes

Flower Floral Polymer Clay Pillow Beads LB-2011-0032
Polymer Clay Beads Filled with Flowers and Butterflies!
My all time favourite beads to create are pillow beads. I don't know what it is about them, but I can't resist creating them. I like the way they feel, I love the size of them - most 20mm - although I do have some 15mm sized beads as well.
To me, it is hard to resist what I consider a blank canvas.
I start with a blank sheet of clay; either in a tinted colour - I rarely use a colour out of the package, or a neutral.
If I am using a neutral, I will take one of my kaleidoscope canes and cover the sheet of clay before I cut them to the size of bead that I am creating. The base on the kaleidoscope cane beads will not be a part of the design so it isn't that important to me what colour it is. I will tuck it under when I assemble my bead.
When I am creating a garden of beads, I use my tinted clay as the background and generously slice thin pieces of my leaves, flowers and butterfly canes onto the background. It doesn't matter where they go, I will be cutting them all up anyway.
Before I cut my beads up for assembly, I make sure that they are smoothed out. This helps me not to have to do as much sanding as I would if there were hills and gouges. I have carpal tunnel and hand sanding is a bit hard on my hand, so I do the best to keep it at a minimum.
Once I have cut my beads and assembled them with their pillow stuffing, I smooth my edges, doing the best that I can to make them seem seamless. I usually add a 1mm hole to them before baking, but lately, I have been uping the hole to 3mm. I have been reading beaders that are requesting a slightly larger hole, so I have been doing that for them.
Polymer clay is soft enough after it is finished to allow for hole enlargement if needed.
Once my beads are baked, I drop the flower ones into a bath of ice water immediately, it clears the translucent clay right up and makes it clear.
I handsand the beads through three grits and then add a nice little shine of varathene on them before putting them up to dry.
Once they are dry, I do my photos and the next thing you know, they are here as a new item in my store.
I hope you enjoy the beads and the work that goes into them.
Must go bead,
Julie and Blu

Polymer Clay Floral Cane Chunky Bracelet

Floral Garden Bracelet

Polymer Clay Floral Garden Bracelet
This bracelet was in the making for several years, which just means that I had the bracelet blanks for several years and didn't get around to actually creating anything from them for a long time. I have a habit, good or bad, of picking up things that I see can be used in future projects. I ran across a seller that had these blanks in her store and I bought ten sets. I didn't know what I would do with them and it was before I really got into flower caning, so my coveted canes were all by other folks.
They came in and they were a lot heavier than I realized, so with a hmmmm, I put them away with other bracelet blanks that I had collected with no idea what I would be doing with them.
One day as I was rearranging my studio, I came across these blanks and took them and set them on my work bench with the intention of working on something using them.
I had just finished some new canes and was cleaning up clay, so I grabbed some white clay and built a bead to fit the bracelet. I then added thin slices of leaves and bright colored flowers.
After I baked them, I hand sanded them and added a slight coat of varnish to the beads.
I finished stringing the bracelet and took lots of photos of it.  It does have a little weight to it and it is a large bracelet.
But it's pretty and it is a definate one of a kind bracelet.
Just in time for spring.
Julie and Blu

Orange Green Miami Hurricane Colors Beaded Charm Bracelet

Orange Green Miami Hurricane Colors Beaded Charm Bracelet

Perfect for your University of Miami fan!
This bracelet titled "Peas and Carrots" is lush with my own creations.
This heavily beaded charm bracelet has been hand created from polymer clay beads, lentil beads, Swarovski crystals, seed beads, Czech glass beads and gold plated findings.
The beads have all been created from artist quality polymer clay and have been hand formed into either 10mm round beads, 10 mm disk beads, 15mm flower beads, 15mm heart lentil beads, 10mm round lentil beads, and smaller disks. Each bead has been accented with gold plated bead caps and spacer beads, as well as delica seed beads and ebeads.
Each bead has been lightly varnished to give it shine.
Additional beads include gold plated filigree 6mm beads.
This bracelet is 6 inches with a gold plated toggle and can be re-sized if needed.
This one of a kind bracelet will not be repeated, even though it was great fun to create the beads for and put together.
Want other school colors? Just ask, I might be able to create something along the same line.

The Travelin' Show

image

Friday, May 20, 2011

The Travelin’ Show

Pack up the babies and grab the old ladies and everyone go…..

Traveling with Blu was like having a toddler in the car. “Give me a drink”, “Wipe my face”, “I’m hungry”, “I have to go to the bathroom”, “Oops, I just threw up”.

We traded in the view of the space shuttle from the kitchen table, for the majestic mountains of the Rockies; specifically, the Gallatin Range. I live near places like Roaring Hell Creek now. I am fairly positive that it has that name for a reason.

4th of July Launch Shuttle launch – July 4th

We spent four days on the road with only my beads, clay and some clothes packed. Oh, and my pc and laptop. I had my priorities in order. Everything was precisely packed in the back of my Blazer and Blu was allotted a 4x4 area to sit or lay down. Everything else was walling him in.

bluback Could we get any happier?

He only had one incident, we took a turn too sharp in Atlanta and he became buried under stuffed animals and his dish. He farted.

Our travels took us up through all the areas that were so badly damaged by the tornado outbreak. It was very difficult to see all that damage and be helpless to do anything but pray for the folks in those areas.

The paths were obvious as they crossed the interstates and cut wide swatches through the trees along the road. The last place that we saw damage was in St. Louis and just seeing the rivers and streams all bursting forth gave you the sense of being so insignificant.

DSC_0064 This is the Tennessee River – up and over it’s banks.

We had smooth traveling weather across the Midwest and up into Wyoming. We left intermittent rain behind us in Kansas City, Mo. and sailed the rest of the way into Montana where we were greeted to 50s and 60s and sunny skies.

Our summer rental was ready for us when we got here and I feel so blessed by the new surroundings.

We found a little one bedroom cabin on a pond with mountain views all around us and lots of wildlife. We were immediately greeted by the honking of the Canadian Geese, mallards, a local pheasant, 2 deer, a muskrat, a mating pair of robins and oodles of red wing blackbirds.

pheasant candiangeese Canadian Geese

Yes, I traded in the antics of a pair of crazy rabbits that were using my back porch as a playground and a squirrel that insisted on burying all his nuts in my potted plants for a more rural environment, but I am looking forward to an inspiring summer.

Oh, the robin just decided where she was going to put her nest. Right outside my dining room window! Yay babies!

Robin

Enjoy the photos!

Julie and Blu

A beginner's guide to bead stringing materials

A beginner's guide to bead stringing materials

Julie L. Cleveland

With over thousands and thousands of different beads, websites and craft stores, it is easy for the beginning beader and jewelry maker to get overwhelmed before they even get started.

When you create your first piece of jewelry, you will realize what a rewarding craft this is and you will begin to string beads for yourself and your friends.

To begin your adventure into jewelry making with beads, ... Read More

Share |

Essential tools needed for making beaded jewelry

Essential tools needed for making beaded jewelry

Julie L. Cleveland

The first time you admire someone’s necklace, bracelet, or set of earrings, your mind begins the “I can do that” thought process. It is a safe bet to say that if you would like to learn how to bead a fantastic new pair of earrings, bracelet or necklace, you will learn how to do it.

There are many, many articles, magazines, books and websites dedicated to teaching you how to create anything from wild tribal necklaces to dainty flower earrings.

To begin your adventure into jewelry making .... Read More

Share |

Hurray for the Red, White and Blu!

Once In a Blu MoonSince moving to Montana, I have lost track of the time of the year. There is a good chance that in the next day or so, we will have high elevation snowfalls again and the daily temperature is in the 50s- 60s. I do enjoy the weather, since I know back in Florida it is in the triple digits and my coastal community is looking at 90 plus, plus.
So, I forgot that the 4th of July was coming up, until I had a customer buy my Stars and Stripes Necklace and one of my 4th of July bracelets.
Both of those pieces featured the beautiful lampwork beads of Jacquie Maruri and were created with Swarovski, glass pearls, seed beads and my polymer clay star beads. I handstitched the entire necklace and each strand has been created out of fireline.
I have every intentions of doing the same with all the focal beads that I purchased from Jacquie and each necklace is labor intensive. I have two of these beaded necklaces left at the moment.
One is titled "Egyptian Sunset" and the other one is "Once in a Blu Moon". Jacquie provided the Blu Moon bead and the other was created by Adorned in Treasure.
I have been busy doing freelance writing the last month that I have neglected my bead making and jewelry design. I can't wait to get back to it!
Egyptian Sunset image image

Jewelry Basics Word Search Puzzle

For fun, I created a word search puzzle - print this out and enjoy!

Jewelry Basics Word Search


U U W P L P E G I R W K S U V

J E W E L R Y N K S E R E S H

Z G X S C X S I S G A Z B F W

W N P J W H O G V N V V R L U

N I K P C W V N O I I S A C B

A D R L W E I I R D N S C R L

S A O J P V R R A N G E E Y S

G E W Y J I J T W I O C L S N

N B M T Q T F S S F N A E T O

I H O W G A Q N I Y C L T A H

R A O D C E E X T X M K S L C

R P L T S R A C D Z M C T S O

A P Q I Z C A K Y B I E N X B

E Y E Y R E Q P D U C N V X A

K Y S E E D B E A D S D A J C


Jewelry Basics Word Search - 15 Words to find


BEADING                            JEWELRY                            BRACELETS                          LOOMWORK                           CABOCHONS                          NECKLACES                         

CREATIVE              

SEEDBEADS                          CRYSTALS                           STRINGING                          EARRINGS                           SWAROVSKI                          FINDINGS                           WEAVING                            HAPPY                             


© 2011 jcleveland


Spoiler Alert


Answers on next page.


Jewelry Basics Word Search - Solution


              G I   W        

J E W E L R Y N K S E        

  G           I S G A   B    

  N           G V N V   R    

  I K         N O I I   A C  

  D R     E   I R D N S C R  

S A O     V   R A N G E E Y S

G E W     I   T W I   C L S N

N B M     T   S S F   A E T O

I H O     A           L T A H

R A O     E           K S L C

R P L     R           C   S O

A P       C           E     B

E Y                   N     A

    S E E D B E A D S       C  

Polymer Clay Purple Violet Blossom Flower Necklace

Lentil Bead Necklace
This necklace is an example of how my lentil beads can be used to create a multi-strand necklace with resin flowers and Czech emerald glass beads.
This was the project that I completed for a Polymer Clay Smoosher's Artfire group project on something spring-like and flowery.
I love purple and the combination of both purple and green reminds me of the fresh violets that bloom every spring "up north".
Check out the other lentil beads that I have for sale and see if there isn't a set that sparks your creativity and just begs for you to create a necklace for yourself.
Black and White Lentil Beads

The History of Christmas in July

Christmas in July Sales history

Ah, July.

July means we are half way through the year, and while in some places the heat makes it hard to think about Christmas, but many places bring out their holly and lights and trumpet a “Christmas in July” sale. According to some various sources that Wikipedia fanatics have amassed, the actual source of the holiday frenzy is attributed to many different angles. Some say that it comes from an opera where children rehearse Christmas songs in July which prompts an astute observer to quip that when you sing Christmas in July, you rush the season.

Others probably closer to the mark, have attributed the “Christmas in July” to the simple fact that there are no marketing opportunities from July 4th in the United States and July 1st for Canada Day until Labor Day for both the United States and Canada in September.

Either way, the fact is, most retailers are selling their products at a discount for the entire month of July. 

Of course, not to be left out, all Blue Morning Expressions items are on sale as well.

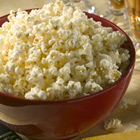
For others, July means fairs, picnics and carnivals. Rodeos, street fairs, craft fairs and in Butte, Montana, Evel Knievel Days. No matter what your fair or carnival preference, one thing is certain. There will be cotton candy and kettle corn. And as a new devotee of kettle corn, a found recipe is now laminated and held up on the refrigerator (under a bright green frog magnet from Blue Morning Expressions of course).

Here is the recipe in its entirety and comes compliments of Allrecipes.com :

Kettle Corn

image

Rated:

rating

Submitted By: SUE202

Photo By: Allrecipes

Prep Time: 5 Minutes

Cook Time: 15 Minutes

Ready In: 20 Minutes

Servings: 5

"White sugar makes the Kettle Corn taste like popcorn balls. Use brown sugar and it will taste like caramel corn."

Ingredients:

1/4 cup vegetable oil

1/4 cup white sugar

1/2 cup unpopped popcorn kernels

Directions:

1.

Heat the vegetable oil in a large pot over medium heat. Once hot, stir in the sugar and popcorn. Cover, and shake the pot constantly to keep the sugar from burning. Once the popping has slowed to once every 2 to 3 seconds, remove the pot from the heat and continue to shake for a few minutes until the popping has stopped. Pour into a large bowl, and allow to cool, stirring occasionally to break up large clumps.

For caramel corn lovers, note the recipe variation for caramel corn.

Have a fun and safe summer and take advantage of Blue Morning Expressions’ enthusiastic participation in the “Christmas in July” phenomenon and look for sales for the entire month of July.

Oh, and here is the frog magnet and he is on sale:

image

Fudge! It's Not Just For Christmas :)

Chocolate Fudge Homemade Hillside Bakery

I love fudge - I normally am not a chocolate eater, but I make an exception for fudge. I am mystified by the properties of fudge, it isn't like a mess of melted chocolate that sticks to your fingers or refuses to come off the package. Instead, it is a block of delicious goodness that when eaten triggers an overwhelming urge for a glass of ice cold milk.

I admire people who can make fudge. I am not one of those people. My one and only attempt at fudge making was in August of 2004 in Florida. I somehow missed an ingredient and it refused to solidify or even to look pretty. I put it in the refrigerator and kept an eye on it. Occasionally, I would go and take a chunk out of it- the taste wasn't bad - but when I would go back and look at the pan, the missing space was filled in with more fudge.

It became the pan of the perpetuating fudge. It always self-leveled, it became thinner and thinner the more I picked at it. Then we had the hurricanes of 2004 and we personally took a couple direct hits. After the first one, we had no power for a couple weeks. The fudge lived on in a dead refrigerator. Never drying up, never going bad - just sat there perpetuating.

Good homemade fudge is hard to come by and it is obvious that I can not just whip up a batch the next time that I want fudge, so it was a “beoutifool” thing that I discovered Lisa at Hillside Bakery. Lisa knows how to make fudge!! Happy dance!

I got a sampler box and we have been sampling. She sent us her candy bar series and I staked out the coconut filled fudge (Mounds) and the candy dot fudge (M&M) as my momentary favorites. My other half has laid claim to the Pecan and the Almond Coconut (Almond Joy) fudge as his. The peanut butter (Reeses) is still pristine in its package. As a die hard Reeses fan, I am squirreling it away for an emergency.

Lisa is lovely to work with and I have two more half pounds in my shopping cart on Artfire waiting on me finishing the purchase. I am going to try some vanilla fudge this time. Yum!

Go buy some of her fudge and tell her that Julie and Blu sent you.

Go now, buy some!

http://www.artfire.com/users/hillsidebakery

Hillside Bakery Fudge

Monday, October 3, 2011

October 2011 BluPrint Official Newsletter of Blue Morning Expressions

Volume 8 Issue 10, October 2011

What's New in October?

Artfire—In an effort to conserve space, accommodate my regular customers and to take advantage of a great handmade site, I have consolidated all my websites into one at Artfire. All of my other sites are still updated and used, you can still access your customer information and your order history, I am just using Artfire to save space and make it convenient for my customers. You will find Blue Morning Expressions, X-Stitch-Patterns, The Seed Bead Pattern Store, and Clipon Earrings Boutique. If you are interested, you can find me at http://www.artfire.com/users/bluemorningexpressions

Writing—I have spent the last month writing full-time and I must confess, I have sorely neglected all my canes and polymer clay items. I did over 250 web articles and one feature article for a local newsmagazine. All of these things were fun to do, but very time consuming and my clay suffered. I had quite a few sales of canes and over half of my inventory went out in boxes this last month. That is good for clearing space for me, but bad for providing a great selection of canes for you!

Kaleidoscope Canes -I started to do my canes that I had drawn out and ran into problems with my clay being too soft to work with. I put it out to leach some of the moisture out of the clay and got busy doing other things. This made the clay unsuitable for the project I had in mind, so I have to start over. This would not be a problem, except that one of my canes was specific to Halloween and featured candy corn. Oh well, off to work on new designs.

clip_image002clip_image004

Beads—I am working on new focal beads and doing a few necklaces with the penguins that I did last year for Christmas. I have six focal beads ready to go and will get those necklaces done soon. The next sets of focal beads will be ready in the next couple of weeks. You can find both the beads and the finished necklaces on www.bluemorningexpressions.com or at my Artfire store http://www.artfire.com/users/bluemorningexpressions

As always, thank you for all your support and emails.

www.bluemorningexpressions.comclip_image004

Until next month,

Julie & Blu

clip_image002[4]clip_image006clip_image008

New Products:

Earrings—These are all created from my bead sets, I used both floral rounds, heart swirl lentils, and full size 20mm pillow beads to create 30 new sets of earrings. Each set is under $4—I wanted to create an affordable set of earrings for gifts that can be easily purchased in groups. The only sets not under $4 are the dangle heart swirls, those are under $10.

clip_image008[4]clip_image010clip_image012clip_image002[6]clip_image004[4]clip_image006[4]